| — Sue Miley |
The Main Game is the main portion of the Death Game in which all participants are forced to play under threat of death. It is divided into two sections, and in the end, it is guaranteed that at least two of the participants will die.
The first half of the game, the preliminary round, is to determine half the preferred candidates of who will die. Ideally, neither the Keymaster and Sacrifice are chosen as candidates. The second half is used to determine who it is safe to vote for. Acts such as using rock-paper-scissors to fairly decide the victim are forbidden. If only one is chosen in the preliminary vote, that person will be the victim, so there's no need for a final vote.
Roles[]
")
")
")
")
The Main Game has four roles, and each has a different consequence for receiving the majority vote.
| Keymaster (鍵番, Kagi-ban?) |
Sage (賢者, Kenja?) |
Sacrifice (身代, Migawari?) |
Commoner (平民, Heimin?) | |
|---|---|---|---|---|
| Ability | Immunity/safe as long as everyone knows they're the Keymaster. | Knows who the Keymaster is via divination, but can not lie about the results of the divination. | Gets 2 votes. | None. |
| If they receive the majority vote | Everyone dies. | They and the Sacrifice die. | Everyone except the Sacrifice dies. They also get to choose one other person to survive. | They and the Sacrifice die. |
| To survive | Vote for a Commoner or Sage. | Vote for a Commoner. | Get the majority vote. | Vote for a Commoner or Sage. |
")
")
")
")
")
Fake rule[]
For the first Main Game where the participants picked up physical cards, there was a message on the back of the card in invisible ink.
- “The one who claims this:
This now belongs to you. Keep it on you always. This is a key to the exit. Let no one else know the existence of this card. Otherwise, you will die.” - — Invisible message on the cards.[src]
However, it was a "dummy" rule to throw off the participants. Revealing, or sharing the card to others doesn't really kill anyone. Sou used this information to his advantage and swapped cards. He initially picked up the Sacrifice, which he then planted in the Bar for Kanna to pick up. Then, to put Kanna in his debt, he offered to switch cards with her. Afterwards, he left the Sacrifice to be picked up by Joe.
Plot[]
1st Main Game[]
In the preliminary round, the participants were given 70 minutes to discuss any relevant topic to decide who is either the least cooperative or most suspicious. The final vote had a time limit of 20 minutes. The time limits put an extra strain on the game, as it wasn't just as simple as a moral debate.
Sou sees Q-taro placing the cards.
Before the game, Q-taro's First Trial was to place all of the role cards around the first floor. Sou finds the Sacrifice card but sees Q-taro putting more cards down and realizes that the threat on the back of the cards (You will die if you reveal this to anyone) is a lie. He hides the Sacrifice card and, upon Kanna finding it, trades it with a Commoner card he found to put her in debt to him. He then hides the Sacrifice card.
There are no more trades or switches. Joe eventually finds the Sacrifice card, Sara the Keymaster card, Kai the Sage card, and everyone else find Commoner cards.
During the actual Main Game, Sou starts off the game by falsely claiming that he is the Keymaster. Sara has the option to either refute this or stay silent, although this doesn't actually affect the outcome of the game. After this, Q-taro suggests voting Gonbee, due to him being the least trustworthy, although it is dismissed due to everyone being executed if he ended up with Sacrifice or Keymaster - meaning everyone would have to suspect 5 or more people.
Gonbee then accuses Sara of becoming a leader and gaining everyone's trust simply by having the only weapon in the facility - that being the gun. Sara refutes this by revealing the Long Narrow Box, which had the impression of a knife - indicating there was another person with a weapon in the facility.
Q-taro progresses the conversation by accusing Gin, Nao and Kanna of being the least useful out of everyone. None of the three refute, but Kanna reveals she would be fine with dying. Kai states that they should not be hasty with their decision, as it's possible Kanna picked up the Sacrifice card.
Sou suggests setting the subject of Kanna aside and focusing on Nao and Gin's defenses. It is revealed Gin found a torn piece of paper - seemingly suggesting Sara was a murderer. However, Sara refutes the claim with her own sheet of paper of the same variety. The piece of paper then reveals someone named Alice Yabusame as a murderer.
Sara then accuses Reko, due to Yabusame being her last name - and Keiji suggests Reko could just be an alias. Gonbee then pipes up, claiming that he is actually Alice. It is revealed that Alice was actually Reko's older brother and that he murdered someone. After the murder case, they both completely cut off any communication with each other.
Nao is then asked to defend herself and her actions - and states that she sat in the kitchen, in the dark, with Mishima's head in a box the entire time. Sara refutes this by mentioning the long narrow box - that of which had a knife missing. Nao claims the kitchen door was unlocked, so she ran in and locked it - suggesting someone took the knife beforehand. Keiji comments on how Mishima's head was missing from the box - to which Nao does not know the answer to.
The question is turned to why Nao only felt sad about Mishima's death, rather than angry. Sou suggests that Nao took Mishima's head for the collar it contained - although, Reko reveals that she overheard a conversation between Mishima and Nao. Mishima suggested to Nao that they vote for each other.
When the topic shifts to the identity of the Sage, Joe, Kanna and Kai all claim to have the role. Joe and Kai state that the Keymaster is Sara, whereas Kanna attempts to convince the group that it is Sou who is the Keymaster. To prove their identity, they are asked about the design of the Keymaster card.
Kai is revealed to be the Sage, from the fact that the Sage doesn't know the design on the Keymaster card, which both Joe and Kanna said the Keymaster has a design of the key and a lock, revealing the identity of Kai's card as the Sage. This leads Kai to out Joe as the Sacrifice, but it isn't enough to prevent Sou and most of the group to vote for him.
No matter who is voted for, Joe is killed as the Sacrifice (voting for Joe or not voting for him will generate different dialogue from him), and Kai gains the most votes. He commits suicide using the aforementioned kitchen knife to avoid a similar fate to Joe and to prevent Miley from having the satisfaction of killing him.
2nd Main Game[]
Following the events of the Final Attraction, Gashu took over as Floor Master host and explained the rules leading up to the second Main Game, which would utilize the tokens everyone collected.
The fundamental change is that the cards are now digitally displayed on their voting tablets, and people can forcefully trade cards. (The caveat, that's later revealed, is that you can also forcefully trade other people's cards as well.)
Gashu raised telephone boxes, called "Ring-Up Box," from the ground. They appeared in everyone's bedrooms and in a few other places as well. To exchange their card with someone else they have to use 50 tokens. (Again, like in the Sub-Game, their own Me-tokens are not acceptable currency.) They had three hours to make use of their time until the Main Game officially started.
Out of eight participants, up to four could be voted for in the preliminary round. During the discussion the following information comes out:
- Keiji, who had told Sara he was the Keymaster and traded the Keymaster card for Sara's Commoner card, was a lie. He was a Sage, in the beginning, knew who had the Keymaster card, and forcefully exchanged it with Sara's to gain her trust.
- Nao, who had the Sacrifice card, took Alice/Reko's tokens (depending on who died that route) and traded her card with Q-taro since she knew he could afford to trade it. (This occurred while Sara and Keiji were hiding from Miley on the 1st floor.)
- Q-taro, once he got the Sacrifice card, went to Sou. In exchange for 100 tokens and showing his card to him, Sou agreed to share Kai's laptop. While everyone was looking over Kai's laptop, Sou excused himself to "go to the bathroom," and then he forcefully traded Q-taro and Sara's cards. Sara then ended up with the Sacrifice. (At this time, Gin was still searching the first floor alone.)

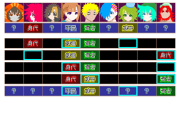
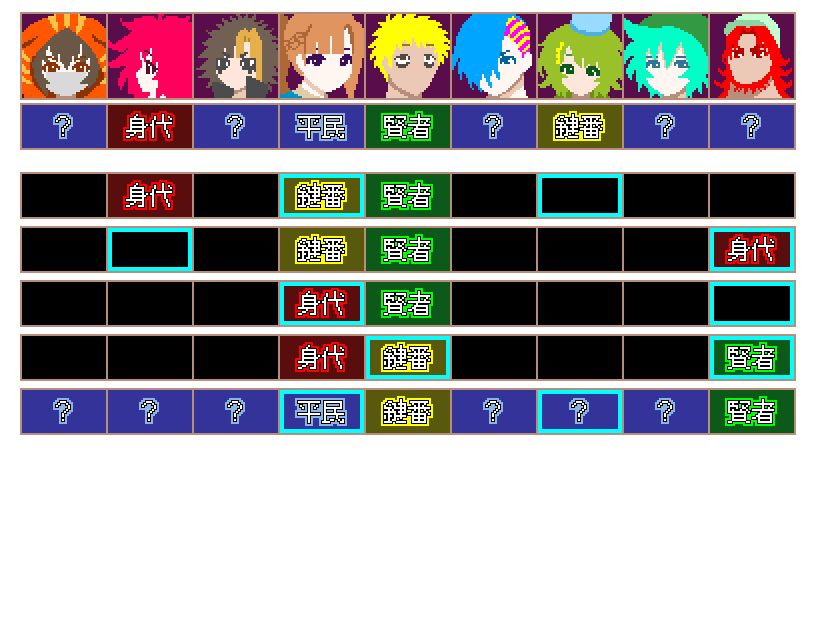
The last card distribution table shown.
- Q-taro, furious at Sou for trading away his Sacrifice card, had planned to forcibly take back his tokens when Keiji stops him. Keiji also knew, using the Sage's "clairvoyance," that Q-taro was now the Keymaster. After conferring, they agree to team up, and Q-taro gives his remaining tokens to Keiji. Afterward, Sou knocks out Q-taro with a stun gun and gains temporary access to Q-taro's tablet. Keiji trades his Sage card for Q-taro's Keymaster while Q-taro is knocked out. (This trade occurs while Sara, Gin, and Nao are in the Doll Storage room.)
- Kanna realizes from Sara's overall demeanor that Sara's the Sacrifice and goes to trade her own Commoner card with Sara's. However, Gashu interferes with the Game and has the Sacrifice rerouted to Nao.
| Trade | Gin | Nao | Sara | Keiji | Reko/Alice | Kanna | Sou | Q-taro | |||||||
|---|---|---|---|---|---|---|---|---|---|---|---|---|---|---|---|
| Start | Common | Sacrifice | Common | Sage | Common | Key(※) | Common | Common | |||||||
| 1st | Common | Sacrifice | Key | Sage | Common | Common | Common | Common | |||||||
| 2nd | Common | Common | Key | Sage | Common | Common | Common | Sacrifice | |||||||
| 3rd | Common | Common | Sacrifice | Sage | Common | Common | Common | Key | |||||||
| 4th | Common | Common | Sacrifice | Key | Common | Common | Common | Sage | |||||||
| 5th | Common | Sacrifice | Common | Key | Common | Common | Common | Sage | |||||||
In the end, Keiji isn't able to receive a vote due to being the Keymaster, Nao is the Sacrifice, and either Kanna or Sou are the only viable candidates to vote for if everyone else wants to live. Reko/Alice and Q-taro voted for Sou; Keiji and Gin voted for Kanna; Nao with her two extra votes voted for herself. Sara remains as the tiebreaker between all three, and her vote determines the story's route.
Trivia[]
- The design of the ballots has a golden silhouette of what looks like a sword with a ring-pommel.
")
- An unused image file, titled "See this exchange visit", shows that Kanna was the one to have the Keymaster. However this is unused so it might've been scrapped.
- In the manga, the Sacrifice is called the Scapegoat. A more fitting name since voting for the Sacrifice is a scapegoat from the game.
- According to the CG aftermath of Gashu killing himself, the circle of hourglass tables shrink as the amount of people are left.
- The placement of the characters and their respective hourglasses is the same as they appear on screen during discussions. In clockwise direction: Sara>Joe>Keiji>Kanna>Q-taro>Sou>Alice>Mishima>Gin>Kai>Nao>Reko.
[]
| v • e World of Your Turn to Die | ||
|---|---|---|
| Terminology | Artificial intelligence • Doll • Obstructor | |
| Death Game | Attractions • Main Game • Murderer Game • The Hades Incident • Trials | |
| Groups | ASU-NARO • Dummies • Samurai Yaiba | |
| Items | List of inventory items • Four Papers • Clear Chips and Me-Tokens • Collar • Kai's Laptop • Mew-chan • Ring-Up Box • Voting Tablet • Lantern | |
| Locations | Chidouin Residence • Isle of Memories (Beach hut) • Sonobeno High School | |
| Facility | Floor 1 • Floor 2 • Floor 3 (Prize Exchange) • Floor 4 • Floor 5 • Floor ? | |